Gran Turismo 6 as well as previous version of the Gran Turismo games have had a photo mode. This mode allows you to get a car and take a picture of it. It doesn’t sound useful towards the game, but the mode goes into so much detail about photography that it becomes really fun. All the pictures on this site are from in game photo mode. As I am sure you have noticed, the pictures look amazing and a tiny bit of computer editing really puts them over the top. There is no reason why you can’t take beautiful pictures too.
Here is my Top 10 GT6 Photography Tips for getting the best shots that will impress even the most skilled photographers. Very easy to do and will instantly improve your photos. Before we start there is an actual photo mode in the main menu way over on the right hand side or after you do a race, watch the replay, press start and press the green camera button.
If you are interested in Gran Turismo photos I have a Team Shmo Tumblr that shows off the very best GT photos out there.
1. SETTINGS
The second you get into photo mode whether that is the actual photo mode or the photo mode during a replay of a race you just did there are certain settings you must change right away for the best shots. Press triangle and on the right a menu will open. Change the aspect ratio to 16:9 and panning to mode 3. You will have to do this EVERY time. It is super annoying, but always remember to change these. You can use different aspect ratio’s, but 16:9 is the official wide screen shot that makes every shot look better. As for mode 3 I have no idea why, but mode 3 works best.
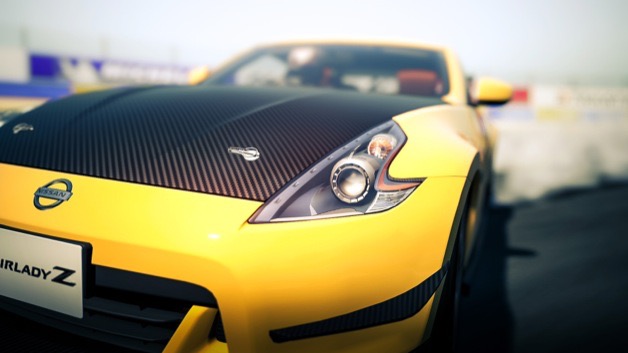
2. CAR CHOICE
This is debatably number 1, but technically any car will look good while not changing the settings will look bad. The car choice for best results is gonna be a premium one. Premium cars have detail interiors and just look better. The more interesting the car to start (body lines, color, rims, etc) the more interesting the end shot will be.
3. RULE OF THIRDS
Basically you usually do not want to have a photo just zoomed into the car. The final shot just won’t be that interesting. Pretend there is grid over the photo and you want to position the car somewhere on the intersecting lines. The photo below shows a shot using rule of thirds. Picture the grid in your mind and try to align the car where two of the lines intersect.

4. FOCUS
Press square! You got the car, the location, the angle perfect now press square on the part you want in focus. Everything below this point will not matter if your shot isn’t in focus. Which part you want in focus is really up to you. I usually aim the camera towards whatever part of the car is the closest to me and press square. If you look at the other pictures, you will see I pressed square on the car making it in focus.
5. SHUTTER SPEED
This is the settings that will say 1/250sec at the bottom. Basically it means how “fast” the photo looks. You do not have to change this in photo mode, but is very important in replay photo mode. A really high setting of 1/640 will make the car look almost stopped while a setting of 1/60 will make the background have a very motion blur effect. For 99% of my photos I use 1/60 since I like having the rims look like they are moving and the road whooshing away. If you look below the grass seems like it is blurred and moving really fast giving a real sense of speed to the photo. Higher setting will do the same thing just less of the effect.
6. APERTURE
At the bottom it says F/and a number. This is basically how much the background is gonna be blurred. Something low like F/1.4 is gonna make the background very blurry and out of focus while something higher like F/16 will bring more detail into the background. Where you pressed square will always be the most in focus while this setting affects everything else. I usually use F/1.4 to F/2.8 because I want the background very blurry.
7. ZOOM
Setting at the bottom that says F= and a number is the zoom. A tip is hold R1 and move with R3 to zoom fast. This is actually trickier then you may think. There is two different types of zooming. You can bring the camera in close to the subject or you can move the camera far away and zoom in. The two settings before this also affect how the photo will look based on what zoom you picked. Having the camera far away and zooming in will make the background blurred a lot while keeping the full car in focus, but having the camera itself zoomed in will blur even more.
It is kind of tricky to explain and is up to you in the end, but below is a photo with the camera moved in very close. As you can see it really puts in focus the parts very close to it while everything else is blurred a lot. If this was farther away and zoomed in you would see a lot more of the car. More of the car would also be in focus, but background either way is gonna be blurred.
8. EXPOSURE
How bright do you want the photo? EV at the bottom is exposure. You can also lock the exposure. Having the light source hitting directly on your car and taking the pic from the same way will give you the brightest photo. Having the light source coming from behind the car will make the car very dark most of the time. Usually you will have to raise the exposure and then lock it to make sure it doesn’t change.
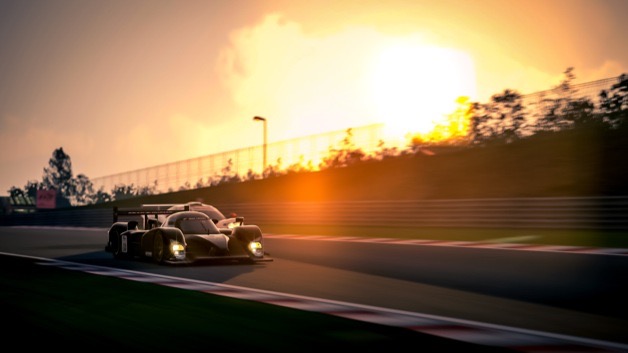
How much light you want is up to you for the shot, but below is a shot with the light source behind. Shots like this are difficult because as you can see the car is now very dark. For this particular photo that is what I was going for with a sunset look, but for the most part I just try to set the camera up so the car looks good without changing exposure at all. Too much exposure to make the car bright enough to see would make the sky totally white and lose all detail while any darker and the car wouldn’t be able to be seen. Finding the balance is what you are looking for.
What I have been doing more recently and has worked very well is if the light is hitting your car and not coming from behind what I usually do is called “exposing for the white point”. What this means is you set it up how you want and keep lowering or raising the exposure until the brightest parts of the photo can be seen. The photo below you see the sun it totally white and blown out, but to do this technique you would keep lowering the exposure until you can actually see detail in the sky and the sun looks like a sun instead of just all white with no detail. However, like I mentioned you do this usually for front lit shots since if you did do it for a shot like below the car would be totally black.
9. FILTERS
There are a few filters to pick in GT6 and while some may look cool I suggest not using any. It’s a lot easier to download a photo editing app on your computer to make changes. Pro ones like Photoshop or Lightroom will be the best, but cost a lot of money. Some great free alternatives are GIMP or pixlr. I personally use Lightroom for 99% of my shots with the smallest amount of Photoshop just to make the banners or get real crazy edits.
10. EDITING
This step is optional, but obviously the photos will look much better if you do it. The real difference between the good shots and the great ones is the editing. I can’t go into too much detail about this since each shot is gonna be different and it’s more of a personal choice on how you want it to feel. However, I can give a couple tips that will make the photo much better in literally 2 min.
Brightness and contrast is very important to change as sometimes your car won’t be as bright as you want it. If you raise the brightness usually raise the contrast to keep the dark areas still dark. Color correcting is also important to get the exact colors you want rather than the ones GT6 gives you. Maybe you want it to be a little more orange, maybe the photo came out with a green hue and you want it blue, etc. Finally sharpness! This is gonna make it pop and look much better. You don’t want it super insanely sharp, but just enough to where things start to pop out at you.
The top photo is straight out of GT6 camera and the bottom one is after some editing. Just small changes make a large impact on the viewer. The bottom photo is a little brighter and darks a little darker, sharpness applied, and small color change. My thought process was it was a sunny day so I wanted it to be a little more orange like a sunset. Pretty common sense (lol), but it goes a long way.
If you enjoyed the guide, but wish it was more detailed a much more in depth guide can be found here. It is for GT5, but nothing has changed in terms of how things work.
BONUS: If you press triangle on the side it will say magnification. If you set it to 2X that means double the resolution for your pictures. At the standard 16:9 that gives you a 1920×1080 which is HD, but after the 2X that makes it 3840×2160. Much sharper photos that will look better overall since you have more room to crop, edit, better prints, etc. One warning is taking a photo at 2X takes at least 15 seconds to even show you the photo after you have pressed capture. If you plan on shooting a lot of photos a lot of time will be taken up just waiting for them to save. If you are new to photo mode I suggest shoot at normal 1X magnification so you can shoot faster.

